Shape Properties and Settings
Each shape that is created or imported appears on a separate line in the top section of the Data Properties and Settings panel. You can control the visibility of a shape within a view with the icons available in the top section of the panel, as well as access settings in the lower section to apply effects to selected visuals. A pop-up menu is available for exporting shapes in the .ORSObject file format (see Exporting Objects).
Shape properties and settings

A. List of shapes B. Visual effects and properties
All shapes that can be added to scene views are listed in the top section of the Data Properties and Settings panel.
- Click the Shapes
 icon at the top of the panel to see the available shapes (see Filters for information about filtering the listed items).
 - Click the Eye icon on the left side of the listed item to show or hide the shape in the current scene. Click the 3D icon on the right side of the listed item to show or hide the shape in the 3D view of the current scene. See Object List for more information about changing visibility.
- Click the color box to change the color of the lines that define a shape.
- Select a shape to access settings to modify its properties.
- Right-click a shape to access export functions (see Exporting Objects).
Contains a list of all the available objects — image data, regions of interest, multi-ROIs, and meshes — to which selected shape effects can be applied. For a selected effect, the Effects properties box displays the properties based on the nature of the effect and includes controls, such as sliders, menus, and color swatches, that you can use to change its properties. You should note that it is possible to apply shape effects to multiple objects and to corresponding data that is either inside or outside of the shape. You should also note that multiple effects can be applied simultaneously (see Working with Multiple Effects).
Visual effects can be applied either to the inside or outside of a shape. Check the Outside option to apply the effect to the data of selected visuals that is exterior to the shape. Leave the Outside option unchecked to apply the effect to the data of selected visuals inside the shape.
Shapes are independent objects and will consider all voxels of the selected visual. If a visual is clipped, clipped data will still be included in the shape.
The properties of the visual effects are described in the following table.
| Example | Description | |
|---|---|---|
|
Clip |
|
If selected, the data of selected visual(s) that corresponds to the inside or outside of the shape will be clipped. |
| Edge Contrast* |
|
If selected, the intensity values of selected image data that correspond to the inside or outside of the shape will be modulated with the values of their gradient modulus to produce an image in which edges are emphasized and other features are semi-transparent. The degree of contrast can be adjusted with the Contrast slider, as shown below.
|
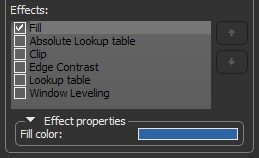
| Fill** |
|
If selected, the voxels contained within the inside or outside of the shape will be filled with a solid color. To select a fill color, click the color swatch and then choose a color in the Color dialog.
|
|
Lookup Tables* |
|
If selected, a lookup table (LUT), absolute LUT, or a cyclical LUT function will be applied to the image data of selected visual(s) that corresponds to the inside or outside of the shape. LUT functions determine how regions within specific arrays of intensity are highlighted and how color is applied (see Using the LUT Editor). Lookup tables can be selected in the drop-down menu, as shown below.
Absolute Lookup Table… If you choose an absolute LUT, color mapping will be applied independently of window leveling. This means that the colors mapped to specific values will be retained whenever leveling values are changed. For regular LUT functions, colors will be remapped to the range of values defined by the window width. Cyclical Lookup Table… The selected LUT will be applied as a periodic or cyclical color map. This means that when labels are mapped to a color map of k discrete colors, labels 1 through k are be mapped to those colors. Labels k+1 through 2*k are mapped to the same colors, while labels 2*k+1 through 3*k are mapped to those same colors and so on. |
|
Window Leveling* |
|
If selected, new window level values can be applied to the image data of selected visual(s) that corresponds to the inside or outside of the shape. The width of the window, as well as its center value, can be selected with the Width and Center sliders, as shown below.
|


* Applicable to selected image data and image data corresponding to selected regions of interest and multi-ROIs.
** For selected image data, all voxels within the bounding box will be considered. For selected regions of interest and multi-ROIs, only labeled voxels will be considered. For selected meshes, only voxels that correspond to the surface of the selected mesh will be considered.
In some cases, you may find it advantageous to apply multiple effects to a visual or visuals. For example, edge contrast, window leveling, and a look-up table. You should note that Dragonfly applies selected effects in the order they appear in the Effects panel. Reordering effects will have an impact on the final look of the visual by either subtly or dramatically changing its appearance.
Multiple effects applied in different orders

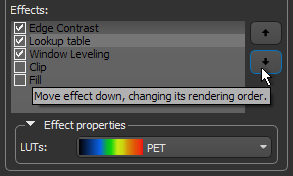
Reordering Effects
If required, you can reorder selected effects with the Up and Down buttons on the right side of the panel, as shown below.
Reordering effects
You may need to readjust an effect property after reordering the selected visual effects.